LINUX實戰:如何在 Ubuntu 16.04 上安裝 OTRS (開源問題單系統)
《LINUX實戰:如何在 Ubuntu 16.04 上安裝 OTRS (開源問題單系統)》要點:
本文介紹了LINUX實戰:如何在 Ubuntu 16.04 上安裝 OTRS (開源問題單系統),希望對您有用。如果有疑問,可以聯系我們。
OTRS ,即開源問題單(ticket)申請系統,是一個用于客戶服務、幫助臺和 IT 服務管理的開源問題單軟件.該軟件是用 Perl 和 javascript 編寫的.對于那些需要管理票據、投訴、支持哀求或其他類型的報告的公司和組織來說,這是一個問題單解決方案.OTRS 支持包括 MySQL、PostgreSQL、Oracle 和 SQL Server 在內的多個數據庫系統,它是一個可以安裝在 Windows 和 Linux 上的多平臺軟件.
在本教程中,我將介紹如安在 Ubuntu 16.04 上安裝和配置 OTRS.我將使用 PostgreSQL 作為 OTRS 的數據庫,將 Apache Web 服務器用作 Web 服務器.
先決前提
- Ubuntu 16.04.
- 最小 2GB 的內存.
- root 權限
?
步調 1 - 安裝 Apache 和 PostgreSQL
在第一步中,我們將安裝 Apache Web 服務器以及 PostgreSQL.我們將從 ubuntu 倉庫中使用最新的版本.
使用 SSH 登錄到你的 Ubuntu 服務器中:
ssh root@192.168.33.14
更新 Ubuntu 倉庫.
sudoapt-get update
使用 apt 安裝 Apache2 以及 PostgreSQL:
sudoapt-get install -y apache2 libapache2-mod-perl2 postgresql
通過反省服務器端口確保 Apache 以及 PostgreSQL 運行了.
netstat-plntu
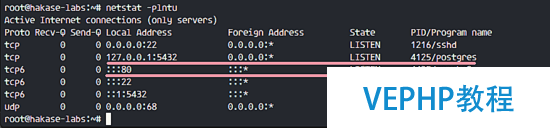
Install Apache and PostgreSQL
你可以看到 80 端口被 apache 使用了,5432 端口被 postgresql 數據庫使用了.
?
步驟 2 - 安裝 Perl 模塊
OTRS 基于 Perl,因此我們必要安裝一些 OTRS 必要的 Perl 模塊.
使用這個 apt 敕令安裝 perl 模塊:
sudoapt-get install -y libapache2-mod-perl2 libdbd-pg-perl libnet-dns-perl libnet-ldap-perl libio-socket-ssl-perl libpdf-api2-perl libsoap-lite-perl libgd-text-perl libgd-graph-perl libapache-dbi-perl libarchive-zip-perl libcrypt-eksblowfish-perl libcrypt-ssleay-perl libencode-hanextra-perl libjson-xs-perl libmail-imapclient-perl libtemplate-perl libtemplate-perl libtext-csv-xs-perl libxml-libxml-perl libxml-libxslt-perl libpdf-api2-simple-perl libyaml-libyaml-perl
安裝完成后,我們必要為 apache 激活 Perl 模塊,接著重啟 apache 服務.
a2enmod perlsystemctl restart apache2
接下來,使用下面的命令反省模塊是否已經加載了:
apachectl -M |sort
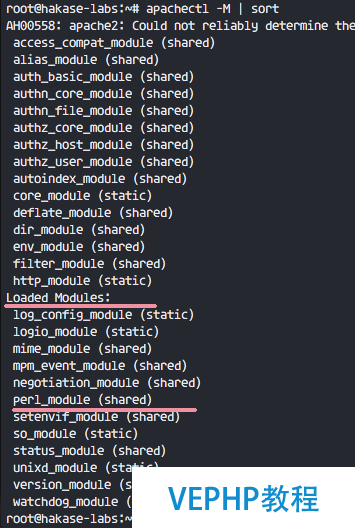
Enable Apache Perl Module
你可以在 “Loaded Modules” 部門下看到 perl_module.
?
步驟 3 - 為 OTRS 創建新用戶
OTRS 是一個基于 web 的程序并且運行與 apache web 服務器下.為了平安,我們需要以普通用戶運行它,而不是 root 用戶.
使用 useradd 命令創立一個 otrs 新用戶:
-
-r:將用戶作為系統用戶. -
-d /opt/otrs:在/opt/otrs下放置新用戶的主目錄. -
-c:備注.
接下來,將 otrs 用戶參加到 www-data 用戶組,因為 apache 運行于 www-data 用戶及用戶組.
usermod-a -G www-data otrs
在 /etc/passwd 文件中已經有 otrs 用戶了.
grep-rin otrs /etc/passwd
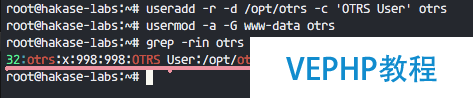
Create new user for OTRS
OTRS 的新用戶已經創立了.
?
步驟 4 - 創建和配置數據庫
在這節中,我們會為 OTRS 系統創建一個新 PostgreSQL 數據庫,并對 PostgreSQL 數據庫的配置做一些小的變動.
登錄到 postgres 用戶并拜訪 PostgreSQL shell.
su- postgrespsql
創建一個新的角色 otrs,暗碼是 myotrspw,并且是非特權用戶.
create user otrs password 'myotrspw' nosuperuser;
接著使用 otrs 用戶權限創立一個新的 otrs 數據庫:
create database otrs owner otrs;\q
接下來為 otrs 角色驗證編纂 PostgreSQL 配置文件.
vim/etc/postgresql/9.5/main/pg_hba.conf
在 84 行后粘貼下面的設置裝備擺設:
local? otrs? ? ? ? ? ? otrs? ? ? ? ? ? ? ? ? ? ? ? ? ? ? ? ? ? passwordhost? ? otrs? ? ? ? ? ? otrs? ? ? ? ? ? 127.0.0.1/32? ? ? ? ? ? password
保留文件并退出 vim
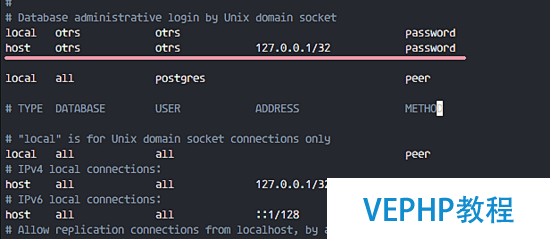
Database Authentication OTRS
使用 exit 回到 root 權限并重啟 PostgreSQL:
exitsystemctl restart postgresql
PostgreSQL 已經為 OTRS 的安裝準備好了.
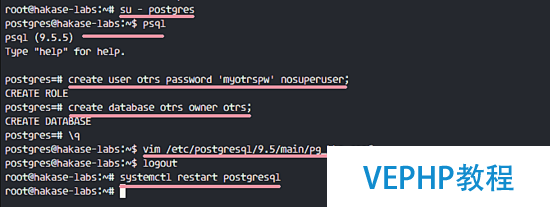
Configure PostgreSQL for OTRS
?
步調 5 - 下載和配置 OTRS
在本教程中,我們會使用 OTRS 網站中最新的版本.
進入 /opt 目錄并使用 wget 敕令下載 OTRS 5.0:
cd/opt/wget http://ftp.otrs.org/pub/otrs/otrs-5.0.16.tar.gz
展開該 otrs 文件,重命名目錄并變動所有 otrs 的文件和目錄的所屬人為 otrs.
tar-xzvf otrs-5.0.16.tar.gzmv otrs-5.0.16 otrschown-R otrs:otrs otrs
接下來,我們必要檢查系統并確保可以安裝 OTRS 了.
使用下面的 otrs 腳本命令檢查 OTRS 安裝必要的系統軟件包:
/opt/otrs/bin/otrs.CheckModules.pl
確保所有的成果是對的,這意味著我們的服務器可以安裝 OTRS 了.
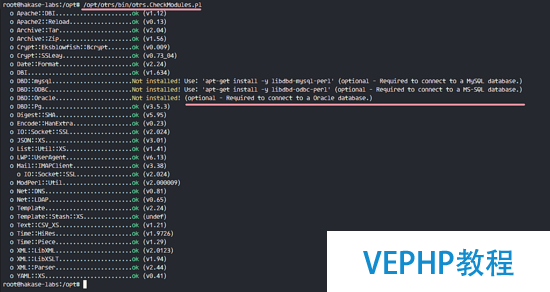
OTRS Chek Module needed for Installation
OTRS 已下載,而且我們的服務器可以安裝 OTRS 了.
接下,進入 otrs 目次并復制配置文件.
cd/opt/otrs/cpKernel/Config.pm.dist Kernel/Config.pm
使用 vim 編纂 Config.pm 文件:
vimKernel/Config.pm
更改 42 行的數據庫暗碼:
$Self->{DatabasePw}='myotrspw';
注釋 45 行的 MySQL 數據庫支持:
# $Self->{DatabaseDSN}="DBI:mysql:database=$Self->{Database};host=$Self->{DatabaseHost};";
撤消注釋 49 行的 PostgreSQL 數據庫支持:
$Self->{DatabaseDSN}="DBI:Pg:dbname=$Self->{Database};";
保留文件并退出 vim.
接著編纂 apache 啟動文件來啟用 PostgreSQL 支持.
vim scripts/apache2-perl-startup.pl
撤消注釋 60 和 61 行:
# enable thisif you use postgresqluse DBD::Pg();useKernel::System::DB::postgresql;
保留文件并退出編輯器.
最后,反省缺失的依賴和模塊.
perl -cw /opt/otrs/bin/cgi-bin/index.plperl -cw /opt/otrs/bin/cgi-bin/customer.plperl -cw /opt/otrs/bin/otrs.Console.pl
你可以在下面的截圖中看到成果是 “OK”:
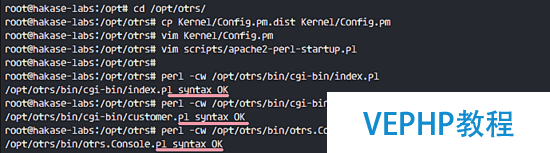
Check all modules again
?
步驟 6 - 導入樣本數據庫
在本教程中,我們會使用樣本數據庫,這可以在腳本目錄中找到.因此我們只必要將所有的樣本數據庫以及表結構導入到第 4 步創建的數據庫中.
登錄到 postgres 用戶并進入 otrs 目次中.
su- postgrescd/opt/otrs/
作為 otrs 用戶使用 psql 命令插入數據庫以及表布局.
psql -U otrs -W -f scripts/database/otrs-schema.postgresql.sql otrspsql -U otrs -W -f scripts/database/otrs-initial_insert.postgresql.sql otrspsql -U otrs -W -f scripts/database/otrs-schema-post.postgresql.sql otrs
在需要的時候輸入數據庫暗碼 myotrspw.

Import OTRS Sample Database
?
步調 7 - 啟動 OTRS
數據庫以及 OTRS 已經配置了,現在我們可以啟動 OTRS.
將 otrs 的文件及目次權限設置為 www-data 用戶和用戶組.
/opt/otrs/bin/otrs.SetPermissions.pl --otrs-user=www-data --web-group=www-data
通過創立一個新的鏈接文件到 apache 虛擬主機目錄中啟用 otrs apache 配置.
ln-s /opt/otrs/scripts/apache2-httpd.include.conf /etc/apache2/sites-available/otrs.conf
啟用 otrs 虛擬主機并重啟 apache.
a2ensite otrssystemctl restart apache2
確保 apache 啟動沒有差錯.

Enable OTRS Apache Virtual Host
?
步驟 8 - 配置 OTRS 計劃任務
OTRS 已經安裝并運行在 Apache Web 服務器中了,但是我們仍然必要配置 OTRS 計劃任務.
登錄到 otrs 用戶,接著以 otrs 用戶進入 var/cron 目次.
su- otrscdvar/cron/pwd
使用下面的命令復制所有 .dist 方案任務腳本:
for foo in*.dist;docp $foo `basename $foo .dist`;done
使用 exit 回到 root 權限,并使用 otrs 用戶啟動方案任務腳本.
exit/opt/otrs/bin/Cron.sh start otrs
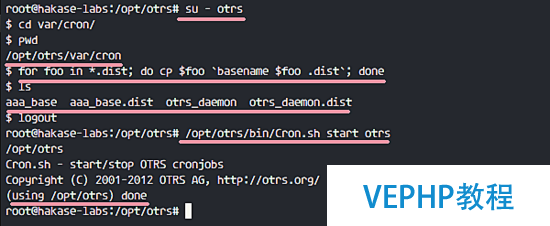
Enable OTRS Cron
接下來,手動收取電子郵件的 PostMaster 創立一個新的計劃任務.我會配置為每 2 分鐘收取一次郵件.
su- otrscrontab -e
粘貼下面的設置裝備擺設:
*/2 * * * *? ? $HOME/bin/otrs.PostMasterMailbox.pl >>/dev/null
保留并退出.
現在停止 otrs 守護過程并再次啟動.
bin/otrs.Daemon.pl stopbin/otrs.Daemon.pl start
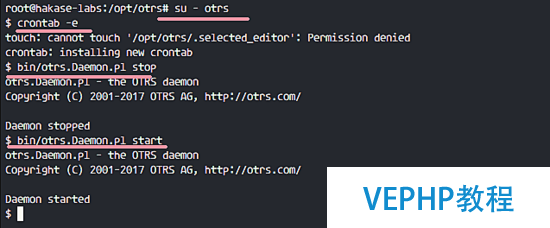
Enable OTRS Fetching Email
OTRS 安裝以及設置裝備擺設完成了.
?
步調 9 - 測試 OTRS
打開你的 web 瀏覽器并輸入你的服務器 IP 地址: http://192.168.33.14/otrs/
使用默認的用戶 root@localhost 以及暗碼 root 登錄.
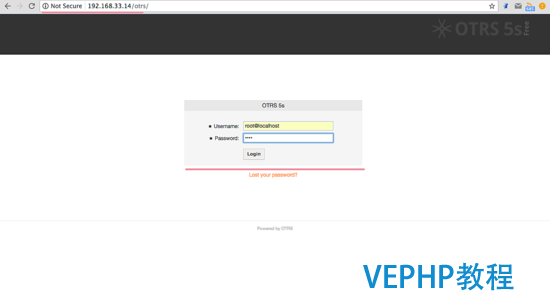
Installation Successfully OTRS Home Page
使用默認的 root 賬戶你會看到一個警告.點擊警告信息來創立一個新的 admin root 用戶.
下面是用另外的 admin root 用戶登錄后出現的 admin 頁面,這里沒有出現差錯信息.
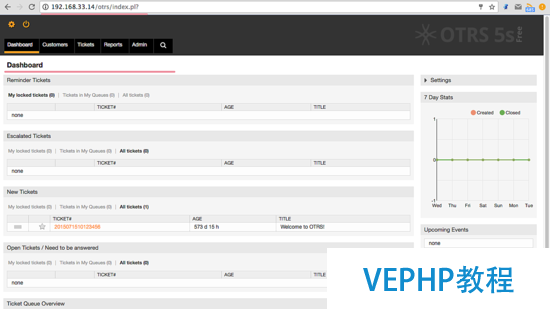
OTRS Admin Dashboard Without Error Messages
假如你想作為客戶登錄,你可以使用 customer.pl :http://192.168.33.14/otrs/customer.pl
你會看到客戶登錄界面,輸入客戶的用戶名和暗碼.
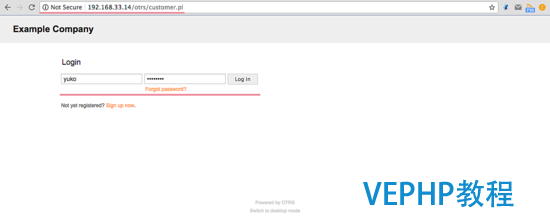
OTRS Customer Login Page
下面是一個創立新單據的客戶頁面.

Customer Open Ticket
?
步調 10 - 疑難排查
如果你仍舊看到 “OTRS Daemon is not running” 的錯誤,你可以像這樣調試 OTRS 守護進程.
su- otrscd/opt/otrs/
停止 OTRS 守護過程:
bin/otrs.Daemon.pl stop
使用 --debug 選項啟動 OTRS 守護過程.
bin/otrs.Daemon.pl start --debug
?
參考
- http://wiki.otterhub.org/index.php?title=InstallationonDebian6with_Postgres
- http://www.geoffstratton.com/otrs-installation-5011-ubuntu-1604
- https://www.linkedin.com/pulse/ticketing-system-otrs-ubuntu-1404-muhammad-faiz-khan
via: https://www.howtoforge.com/tutorial/how-to-install-otrs-opensource-trouble-ticket-system-on-ubuntu-16-04/
作者:Muhammad Arul 譯者:geekpi 校對:wxy
本文由 LCTT 原創編譯,Linux中國 榮譽推出
本文永遠更新鏈接地址:
更多LINUX教程,盡在維易PHP學院專欄。歡迎交流《LINUX實戰:如何在 Ubuntu 16.04 上安裝 OTRS (開源問題單系統)》!
同類教程排行
- LINUX入門:CentOS 7卡在開機
- LINUX實戰:Ubuntu下muduo
- LINUX教程:Ubuntu 16.04
- LINUX教程:GitBook 使用入門
- LINUX實操:Ubuntu 16.04
- LINUX教學:Shell、Xterm、
- LINUX教程:Linux下開源的DDR
- LINUX實戰:TensorFlowSh
- LINUX教學:Debian 9 'St
- LINUX實戰:Ubuntu下使用Vis
- LINUX教學:Linux 下 Free
- LINUX教學:openslide-py
- LINUX實操:Kali Linux安裝
- LINUX教學:通過PuTTY進行端口映
- LINUX教程:Ubuntu 16.04