MySQL半同步復制
《MySQL半同步復制》要點:
本文介紹了MySQL半同步復制,希望對您有用。如果有疑問,可以聯系我們。
簡介
一、前言
二、Mysql 根基知識
三、Mysql 復制(Replication)
四、Mysql 復制(Replication)類型
五、Mysql 主從復制基本步調
六、Mysql 主從復制(異步)
七、Mysql 主從復制(半同步)
八、Mysql 復制對象
九、Mysql 復制注意事變
十、Mysql 復制過濾
一、前言
從這一篇博客開始我們就來學習mysql的高檔課程,在前面的幾篇博客我們講解了mysql基礎知識、mysql日志類型、mysql配置文件、mysql備份策略,這一篇博客中我們來講解mysql的復制.
二、mysql根基知識
1.mysql日記類型
二進制日記
事務日記
差錯日志
一般查詢日記
中繼日記
慢查詢日記
注,有博友對mysql日記不怎么了解,可以參考這篇博客http://freeloda.blog.51cto.com/2033581/1253991
2.mysql二進制日記詳解
闡明:默認開啟,精確的記錄了用戶對數據庫中的數據進行操作的命令和操作的數據對象.
二進制日記文件的作用:
提供了增量備份的功效
提供了數據基于光陰點的恢復,這個恢復的光陰點可以由用戶控制
為mysql的復制架構提供根基,將這主服務器的二進制日志復制到從服務器上并執行同樣的操作,就可將數據進行同步
實現數據的高可用
分擔當載
二進制日志默認寄存位置:
數據目錄下,以mysql-bin.XXXXXX定名的日志
二進制日志格局:
基于語句 statement
基于行 row
混合方式 mixed
二進制日記滾動方式:
重啟服務
日志到達最大上限
執行flush logs
二進制日志變亂:
position 基于位置,也便是offset(偏移量)
datetime 基于光陰
timestamp
二進制日記的查看與刪除方式:
mysql>show master status; 查看當前正在使用的二進制日志mysql>show binlog events in'mysql-bin.000001'; 查看二進制日志記錄的變亂[from position]mysql>flush logs; 二進制日志滾動mysql>show binary logs; 查看所有二進制日志mysql>purge binary logs to 'mysql-bin.000003'; 刪除二進制日志文件系統中查看二進制日志的命令:
mysqlbinlog相關選項,--start-position #開始位置--stop-position #結束位置--start-datetime 'yyyy-mm-dd hh:mm:ss'; #開始時間--stop-datetime ''; #結束時間配置mysql的主配置文件:
sql_log_bin = {ON|OFF} #用于控制二進制日志信息是否記錄進日志文件.默認為ON,表示啟用記錄功能.用戶可以在會話級別修改此變量的值,但其必須具有SUPER權限binlog_cache_size = 32768 #默認值32768 Binlog Cache 用于在打開了二進制日志(binlog)記錄功能的環境,是 MySQL 用來提高binlog的記錄效率而設計的一個用于短時間內臨時緩存binlog數據的內存區域.一般來說,如果我們的數據庫中沒有什么大事務,寫入也不是特別頻繁,2MB~4MB是一個合適的選擇.但是如果我們的數據庫大事務較多,寫入量比較大,可與適當調高binlog_cache_size.同時,我們可以通過binlog_cache_use 以及 binlog_cache_disk_use來分析設置的binlog_cache_size是否足夠,是否有大量的binlog_cache由于內存大小不夠而使用臨時文件(binlog_cache_disk_use)來緩存了binlog_stmt_cache_size = 32768 #當非事務語句使用二進制日志緩存,但是超出binlog_stmt_cache_size時,使用一個臨時文件來存放這些語句log_bin = mysql-bin #指定binlog的位置,默認在數據目錄下binlog-format= {ROW|STATEMENT|MIXED}#指定二進制日志的類型,默認為MIXED.如果設定了二進制日志的格式,卻沒有啟用二進制日志,則MySQL啟動時會產生警告日志信息并記錄于錯誤日志中.sync_binlog = 10 #設定多久同步一次二進制日志至磁盤文件中,0表示不同步,任何正數值都表示對二進制每多少次寫操作之后同步一次.當autocommit的值為1時,每條語句的執行都會引起二進制日志同步,否則,每個事務的提交會引起二進制日志同步max_binlog_cache_size = {4096 .. 18446744073709547520} #二進定日志緩存空間大小,5.5.9及以后的版本僅應用于事務緩存,其上限由max_binlog_stmt_cache_size決定.max_binlog_stmt_cache_size = {4096 .. 18446744073709547520} #二進定日志緩存空間大小,5.5.9及以后的版本僅應用于事務緩存expire_log_days = {0..99} #設定二進制日志的過期天數,超出此天數的二進制日志文件將被自動刪除.默認為0,表示不啟用過期自動刪除功能.如果啟用此功能,自動刪除工作通常發生在MySQL啟動時或FLUSH日志時注:一般建議將binlog日志與數據文件分開存放,不但可以提高mysql性能,還可以增加平安性!
三、Mysql 復制(Replication)
1.Mysql 復制造用
負載均衡(load balancing)
備份
高可用性(high availability)和容錯
2.Mysql 復制若何工作
主要有三步(如下圖):
master將改變記錄到二進制日志(binary log)中(這些記錄叫做二進制日志變亂,binary log events);
slave將master的binary log events拷貝到它的中繼日記(relay log);
slave重做中繼日志中的事件,將改變反映它本身的數據.
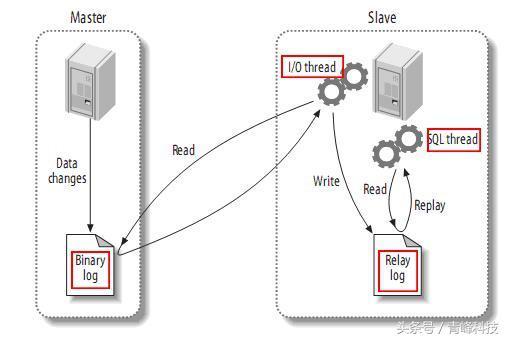
具體闡明:
該過程的第一部分便是master記錄二進制日志.在每個事務更新數據完成之前,master在二日志記錄這些改變.MySQL將事務串行的寫入二進制日志,即使事務中的語句都是交叉執行的.在事件寫入二進制日志完成后,master通知存儲引擎提交事務.
下一步就是slave將master的binary log拷貝到它本身的中繼日志.首先,slave開始一個工作線程——I/O線程.I/O線程在master上打開一個普通的連接,然后開始binlog dump process.Binlog dump process從master的二進制日志中讀取事件,如果已經跟上master,它會睡眠并等待master產生新的事件.I/O線程將這些事件寫入中繼日志.
SQL slave thread處理該過程的最后一步.SQL線程從中繼日志讀取事件,更新slave的數據,使其與master中的數據一致.只要該線程與I/O線程堅持一致,中繼日志通常會位于OS的緩存中,所以中繼日志的開銷很小.
此外,在master中也有一個工作線程:和其它MySQL的連接一樣,slave在master中打開一個連接也會使得master開始一個線程.復制過程有一個很重要的限制——復制在slave上是串行化的,也就是說master上的并行更新操作不能在slave上并行操作.所以slave上數據一般要慢于master上數據.即master與slave之間的數據在必定時間內會不同步.
四、Mysql 復制(Replication)類型
1.mysql復制類型有以下一些基來源根基則
每個slave只能有一個master;
每個slave只能有一個獨一的服務器ID;
每個master可以有許多slave;
假如你設置log_slave_updates,slave可以是其它slave的master,從而擴散master的更新.
注,MySQL不支持多主服務器復制(Multimaster Replication)——即一個slave可以有多個master.但是,通過一些簡單的組合,我們卻可以建立靈活而強大的復制體系布局.
2.mysql復制類型
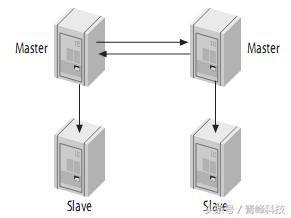
(1).一主多從模式
注,由一個master和一個slave構成復制系統是最簡單的情況.Slave之間并不相互通信,只能與master進行通信.
MySQL通過復制(Replication)實現存儲系統的高可用.今朝,MySQL支持的復制方式有:
異步復制(Asynchronous Replication):原理最簡單,性能最好.但是主備之間數據紛歧致的概率很大.
半同步復制(Semi-synchronous Replication):相比異步復制,半同步復制犧牲了必定的性能,提升了主備之間數據的一致性(有一些情況還是會出現主備數據不一致).
mysql> SHOW GLOBAL STATUS LIKE 'rpl_semi%'; +--------------------------------------------+-------+ | Variable_name | Value | +--------------------------------------------+-------+ | Rpl_semi_sync_master_clients | 1 | | Rpl_semi_sync_master_net_avg_wait_time | 1560 | | Rpl_semi_sync_master_net_wait_time | 10920 | | Rpl_semi_sync_master_net_waits | 7 | | Rpl_semi_sync_master_no_times | 1 | | Rpl_semi_sync_master_no_tx | 1 | | Rpl_semi_sync_master_status | OFF | | Rpl_semi_sync_master_timefunc_failures | 0 | | Rpl_semi_sync_master_tx_avg_wait_time | 985 | | Rpl_semi_sync_master_tx_wait_time | 985 | | Rpl_semi_sync_master_tx_waits | 1 | | Rpl_semi_sync_master_wait_pos_backtraverse | 0 | | Rpl_semi_sync_master_wait_sessions | 0 | | Rpl_semi_sync_master_yes_tx | 6 | +--------------------------------------------+-------+ 14 rows in set (0.00 sec)mysql> STOP SLAVE IO_THREAD; Query OK, 0 rows affected (0.01 sec)mysql> SHOW GLOBAL STATUS LIKE 'rpl_semi%'; +----------------------------+-------+ | Variable_name | Value | +----------------------------+-------+ | Rpl_semi_sync_slave_status | OFF | +----------------------------+-------+ 1 row in set (0.00 sec)組復制(Group Replication):基于Paxos算法實現分布式數據復制的強一致性.只要年夜多數機器存活就能保證系統可用.相比半同步復制,Group Replication的數據一致性和系統可用性更高
具體闡明:
主動的Master-Master復制有一些特殊的用處.例如,地理上分布的兩個部分都需要本身的可寫的數據副本.這種結構最大的問題就是更新沖突.假設一個表只有一行(一列)的數據,其值為1,如果兩個服務器分別同時執行如下語句:
mysql> STOP SLAVE IO_THREAD; Query OK, 0 rows affected (0.01 sec)master:mysql> create table user1 (id int(10)); Query OK, 0 rows affected (1.03 sec)在第一個服務器上執行:
那么結果是多少呢?一臺服務器是4,另一個服務器是3,但是,這并不會產生差錯.
mysql> UPDATE tbl SET col=col + 1; 在第二個服務器上執行: mysql> UPDATE tbl SET col=col * 2;mysql> create table user (id int(10)); Query OK, 0 rows affected (0.42 sec)mysql> show tables; +----------------+ | Tables_in_mydb | +----------------+ | user | +----------------+ 1 row in set (0.00 sec)mysql> insert user value (1); Query OK, 1 row affected (0.34 sec)實際上,MySQL并不支持其它一些DBMS支持的多主服務器復制(Multimaster Replication),這是MySQL的復制功能很大的一個限制(多主服務器的難點在于辦理更新沖突),但是,如果你實在有這種需求,你可以采用MySQL Cluster,以及將Cluster和Replication結合起來,可以建立強大的高性能的數據庫平臺.但是,可以通過其它一些方式來模擬這種多主服務器的復制.
(3).主從模式
注,這是master-master結構變化而來的,它避免了M-M的缺點,實際上,這是一種具有容錯和高可用性的系統.它的分歧點在于其中一個服務只能進行只讀操作.
mysql> SHOW GLOBAL STATUS LIKE 'rpl_semi%'; +----------------------------+-------+ | Variable_name | Value | +----------------------------+-------+ | Rpl_semi_sync_slave_status | ON | +----------------------------+-------+ 1 row in set (0.01 sec)(4).帶從服務器的Master-Master布局(Master-Master with Slaves)
注,這種結構的優點就是提供了冗余.在地理上分布的復制結構,它不存在單一節點故障問題,而且還可以將讀密集型的哀求放到slave上.
mysql> SHOW GLOBAL STATUS LIKE 'rpl_semi%'; +--------------------------------------------+-------+ | Variable_name | Value | +--------------------------------------------+-------+ | Rpl_semi_sync_master_clients | 1 | | Rpl_semi_sync_master_net_avg_wait_time | 0 | | Rpl_semi_sync_master_net_wait_time | 0 | | Rpl_semi_sync_master_net_waits | 0 | | Rpl_semi_sync_master_no_times | 0 | | Rpl_semi_sync_master_no_tx | 0 | | Rpl_semi_sync_master_status | ON | | Rpl_semi_sync_master_timefunc_failures | 0 | | Rpl_semi_sync_master_tx_avg_wait_time | 0 | | Rpl_semi_sync_master_tx_wait_time | 0 | | Rpl_semi_sync_master_tx_waits | 0 | | Rpl_semi_sync_master_wait_pos_backtraverse | 0 | | Rpl_semi_sync_master_wait_sessions | 0 | | Rpl_semi_sync_master_yes_tx | 0 | +--------------------------------------------+-------+ 14 rows in set (0.00 sec)總結:一般常用的兩種復制類型一種是主從模式,另一種是一主多從模式.在這一篇博客中我們主要講授主從模式復制.
五、Mysql 主從復制基本步調
[root@node2 ~]# service mysqld restart Shutting down MySQL. SUCCESS! Starting MySQL.. SUCCESS!1.master 設置裝備擺設
啟用二進制日記
設置裝備擺設一個唯一的server-id
[root@node2 ~]# vim /etc/my.cnf[mysqld]rpl_semi_sync_slave_enabled=1 #啟用半同步復制創立具有復制權限的用戶
2.slave 設置裝備擺設
啟用中繼日記
mysql> INSTALL PLUGIN rpl_semi_sync_slave SONAME 'semisync_slave.so'; Query OK, 0 rows affected (0.38 sec)mysql> SET GLOBAL rpl_semi_sync_slave_enabled = 1; Query OK, 0 rows affected (0.00 sec)mysql> STOP SLAVE IO_THREAD; Query OK, 0 rows affected (0.00 sec)mysql> START SLAVE IO_THREAD;Query OK, 0 rows affected (0.01 sec)設置裝備擺設一個唯一的server-id
連接主服務器,并開端復制數據
啟動數據復制
[root@node1 ~]# service mysqld restart Shutting down MySQL... SUCCESS! Starting MySQL.. SUCCESS!注,基本步調我們就說到這里,下面我們來具體演示一下主從復制.
六、Mysql 主從復制(異步)
1.mysql異步復制
[root@node1 ~]# vim /etc/my.cnf[mysqld]rpl_semi_sync_master_enabled=1 #啟用半同步rpl_semi_sync_master_timeout=1000 #超時時間為1s異步復制:MySQL自己支持單向的、異步的復制.異步復制意味著在把數據從一臺機器拷貝到另一臺機器時有一個延時,最重要的是這意味著當應用系統的事務在主服務器上提交并確認時數據并不能在同一時刻拷貝或應用到從服務器上.通常這個延時是由網絡帶寬、資源可用性和系統負載決定的.然而,使用正確的組件并且調優,復制能做到接近瞬時完成.
當主庫有更新的時候,主庫會把更新操作的SQL寫入二進制日志(Bin log),并維護一個二進制日志文件的索引,以便于日志文件輪回(Rotate).在從庫啟動異步復制的時候,從庫會開啟兩個I/O線程,其中一個線程連接主庫,要求主庫把二進制日志的變化部分傳給從庫,并把傳回的日志寫入當地磁盤.另一個線程則負責讀取當地寫入的二進制日志,并在當地執行,以反映出這種變化.較老的版本在復制的時候只啟用一個I/O線程,實現這兩部分的功能.下面我們來具體演示一下mysql的異步復制.
2.試驗拓撲
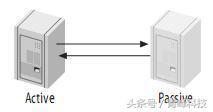
mysql> INSTALL PLUGIN rpl_semi_sync_master SONAME 'semisync_master.so'; Query OK, 0 rows affected (0.39 sec)mysql> SET GLOBAL rpl_semi_sync_master_enabled = 1; Query OK, 0 rows affected (0.00 sec)mysql> SET GLOBAL rpl_semi_sync_master_timeout = 1000; Query OK, 0 rows affected (0.00 sec)注,Active (master,node1) 192.168.1.201 , Passive (slave,node2)192.168.1.202
3.情況配置
mysql> show databases; +--------------------+ | Database | +--------------------+ | information_schema | | mydb | | mysql | | performance_schema | | test | +--------------------+ 5 rows in set (0.03 sec)光陰同步
4.操作體系
[root@node1 ~]# ntpdate 202.120.2.101[root@node2 ~]# ntpdate 202.120.2.101mysql> create database mydb; Query OK, 1 row affected (0.00 sec)mysql> show databases; +--------------------+ | Database | +--------------------+ | information_schema | | mydb | | mysql | | performance_schema | | test | +--------------------+ 5 rows in set (0.00 sec)CentOS 6.4 X86_64
5.軟件版本
Mysql 5.5.33 (注,這里用的是mysql 5.5.33二進制通用安裝包,解壓就能用)
查看master上二進制日志mysql> show master status; +-------------------+----------+--------------+------------------+ | File | Position | Binlog_Do_DB | Binlog_Ignore_DB | +-------------------+----------+--------------+------------------+ | master-bin.000001 | 107 | | | +-------------------+----------+--------------+------------------+ 1 row in set (0.00 sec)銜接master服務器mysql> change master to master_host='192.168.1.201',master_user='repluser',master_password='replpass',master_log_file='master-bin.000001',master_log_pos=107; Query OK, 0 rows affected (0.07 sec)查看一下slave狀態mysql> show slave status\G *************************** 1. row *************************** Slave_IO_State: Master_Host: 192.168.1.201 Master_User: repluser Master_Port: 3306 Connect_Retry: 60 Master_Log_File: master-bin.000001 Read_Master_Log_Pos: 107 Relay_Log_File: relay-log.000001 Relay_Log_Pos: 4 Relay_Master_Log_File: master-bin.000001 Slave_IO_Running: No Slave_SQL_Running: No Replicate_Do_DB: Replicate_Ignore_DB: Replicate_Do_Table: Replicate_Ignore_Table: Replicate_Wild_Do_Table: Replicate_Wild_Ignore_Table: Last_Errno: 0 Last_Error: Skip_Counter: 0 Exec_Master_Log_Pos: 107 Relay_Log_Space: 107 Until_Condition: None Until_Log_File: Until_Log_Pos: 0 Master_SSL_Allowed: No Master_SSL_CA_File: Master_SSL_CA_Path: Master_SSL_Cert: Master_SSL_Cipher: Master_SSL_Key: Seconds_Behind_Master: NULL Master_SSL_Verify_Server_Cert: No Last_IO_Errno: 0 Last_IO_Error: Last_SQL_Errno: 0 Last_SQL_Error: Replicate_Ignore_Server_Ids: Master_Server_Id: 0 1 row in set (0.00 sec)啟動復制并查看狀態mysql> start slave; Query OK, 0 rows affected (0.00 sec)mysql> show slave status\G *************************** 1. row *************************** Slave_IO_State: Waiting for master to send event Master_Host: 192.168.1.201 Master_User: repluser Master_Port: 3306 Connect_Retry: 60 Master_Log_File: master-bin.000001 Read_Master_Log_Pos: 107 Relay_Log_File: relay-log.000002 Relay_Log_Pos: 254 Relay_Master_Log_File: master-bin.000001 Slave_IO_Running: Yes Slave_SQL_Running: Yes Replicate_Do_DB: Replicate_Ignore_DB: Replicate_Do_Table: Replicate_Ignore_Table: Replicate_Wild_Do_Table: Replicate_Wild_Ignore_Table: Last_Errno: 0 Last_Error: Skip_Counter: 0 Exec_Master_Log_Pos: 107 Relay_Log_Space: 404 Until_Condition: None Until_Log_File: Until_Log_Pos: 0 Master_SSL_Allowed: No Master_SSL_CA_File: Master_SSL_CA_Path: Master_SSL_Cert: Master_SSL_Cipher: Master_SSL_Key: Seconds_Behind_Master: 0 Master_SSL_Verify_Server_Cert: No Last_IO_Errno: 0 Last_IO_Error: Last_SQL_Errno: 0 Last_SQL_Error: Replicate_Ignore_Server_Ids: Master_Server_Id: 1 1 row inset (0.00 sec)6.安裝并配置mysql
master:
(1).解壓并鏈接
[root@node2 ~]# service mysqld restart Shutting down MySQL..... SUCCESS! Starting MySQL........... SUCCESS![root@node1 src]# tar xf mysql-5.5.33-linux2.6-x86_64.tar.gz -C /usr/local/ [root@node1 src]# cd /usr/local/ [root@node1 local]# ln -sv /usr/local/mysql-5.5.33-linux2.6-x86_64 mysql "mysql" -> "/usr/local/mysql-5.5.33-linux2.6-x86_64" [root@node1 local]# cd mysql [root@node1 mysql]# ll 總用量 200 drwxr-xr-x 2 root root 4096 8月 24 17:58 bin -rw-r--r-- 1 7161 wheel 17987 7月 15 20:01 COPYING drwxr-xr-x 3 root root 4096 8月 24 17:58 data drwxr-xr-x 2 root root 4096 8月 24 17:58 docs drwxr-xr-x 3 root root 4096 8月 24 17:58 include -rw-r--r-- 1 7161 wheel 134493 7月 15 20:01 INSTALL-BINARY drwxr-xr-x 3 root root 4096 8月 24 17:58 lib drwxr-xr-x 4 root root 4096 8月 24 17:58 man drwxr-xr-x 10 root root 4096 8月 24 17:58 mysql-test -rw-r--r-- 1 7161 wheel 2496 7月 15 20:01 README drwxr-xr-x 2 root root 4096 8月 24 17:58 scripts drwxr-xr-x 27 root root 4096 8月 24 17:58 share drwxr-xr-x 4 root root 4096 8月 24 17:58 sql-bench drwxr-xr-x 3 root root 4096 8月 24 17:58 support-files(2).新建mysql用戶
[root@node1 mysql]# groupadd -g 3306 mysql [root@node1 mysql]# useradd -u 3306 -g mysql -s /sbin/nologin -M mysql [root@node1 mysql]# id mysql uid=3306(mysql) gid=3306(mysql) 組=3306(mysql)[root@node2 ~]# vim /etc/my.cnf#增加下面幾行[mysqld]relay-log = relay-logrelay-log-index = relay-log.indexserver-id = 10(3).改動mysql安裝目錄所有者與所屬組
(4).為mysql提供配置文件并改動
[root@node1 mysql]# chown -R root.mysql /usr/local/mysql/* [root@node1 mysql]# ll 總用量 200 drwxr-xr-x 2 root mysql 4096 8月 24 17:58 bin -rw-r--r-- 1 root mysql 17987 7月 15 20:01 COPYING drwxr-xr-x 3 root mysql 4096 8月 24 17:58 data drwxr-xr-x 2 root mysql 4096 8月 24 17:58 docs drwxr-xr-x 3 root mysql 4096 8月 24 17:58 include -rw-r--r-- 1 root mysql 134493 7月 15 20:01 INSTALL-BINARY drwxr-xr-x 3 root mysql 4096 8月 24 17:58 lib drwxr-xr-x 4 root mysql 4096 8月 24 17:58 man drwxr-xr-x 10 root mysql 4096 8月 24 17:58 mysql-test -rw-r--r-- 1 root mysql 2496 7月 15 20:01 README drwxr-xr-x 2 root mysql 4096 8月 24 17:58 scripts drwxr-xr-x 27 root mysql 4096 8月 24 17:58 share drwxr-xr-x 4 root mysql 4096 8月 24 17:58 sql-bench drwxr-xr-x 3 root mysql 4096 8月 24 17:58 support-files[root@node1 ~]# service mysqld restart Shutting down MySQL....... SUCCESS! Starting MySQL............. SUCCESS![root@node1 mysql]# cp support-files/my-large.cnf /etc/my.cnf[root@node1 mysql]# vim /etc/my.cnf[mysqld]#增加一行datadir = /mydata/data(5).為mysql提供啟動劇本
[root@node1 mysql]# cp support-files/mysql.server /etc/init.d/mysqld [root@node1 mysql]# chmod +x /etc/init.d/mysqldmysql> grant replication slave on *.* to 'repluser'@'192.168.1.%' identified by 'replpass'; Query OK, 0 rows affected (0.61 sec)mysql> flush privileges; Query OK, 0 rows affected (0.41 sec)(6).初始化mysql數據庫
(7).啟動并測試
[root@node1 ~]# mkdir -pv /mydata/data mkdir: 已創建目錄 "/mydata" mkdir: 已創建目錄 "/mydata/data" [root@node1 ~]# chown -R mysql.mysql /mydata/data/ [root@node1 ~]# /usr/local/mysql/scripts/mysql_install_db --datadir=/mydata/data/ --basedir=/usr/local/mysql --user=mysql Installing MySQL system tables... /usr/local/mysql/bin/mysqld: error while loading shared libraries: libaio.so.1: cannot open shared object file: No such file or directoryInstallation of system tables failed! Examine the logs in /mydata/data/ for more information.You can try to start the mysqld daemon with: shell> /usr/local/mysql/bin/mysqld --skip-grant &and use the commandline tool /usr/local/mysql/bin/mysqlto connect to the mysql database and lookat the grant tables: shell> /usr/local/mysql/bin/mysql -u root mysql mysql> show tablesTry 'mysqld --help' ifyou have problems with paths. Using --log gives you a log in /mydata/data/ that may be helpful.Please consult the MySQL manual section 'Problems running mysql_install_db', and the manual section that describes problems on your OS. Another information source are the MySQL email archives available at http://lists.mysql.com/.Please check all of the above before mailing us! And remember, if you do mail us, you MUST use the /usr/local/mysql/scripts/mysqlbug script![root@node1 ~]# cd /mydata/data/ [root@node1 data]# ll 總用量 8 drwx------ 2 mysql root 4096 8月 24 18:21 mysql drwx------ 2 mysql root 4096 8月 24 18:21 test[root@node1 ~]# vim /etc/my.cnf#增加下面幾行[mysqld]log-bin=master-binlog-bin-index=master-bin.indexserver-id = 1innodb_file_per_table = 1啟動報錯[root@node1 data]# service mysqld start Starting MySQL. ERROR! The server quit without updating PID file (/mydata/data/node1.test.com.pid).查看一下差錯日志[root@node1 data]# vim node1.test.com.err130824 18:21:44 mysqld_safe Starting mysqld daemon with databases from /mydata/data /usr/local/mysql/bin/mysqld: error while loading shared libraries: libaio.so.1: cannot open shared object file: No such file or directory 130824 18:21:44 mysqld_safe mysqld from pid file /mydata/data/node1.test.com.pid ended注,從差錯日志中我們看到差一個庫文件libaio,我們用yum安裝一下即可.[root@node1 data]# yum install -y libaio重新初始化mysql[root@node1 data]# /usr/local/mysql/scripts/mysql_install_db --datadir=/mydata/data/ --basedir=/usr/local/mysql --user=mysql啟動mysql[root@node1 data]# service mysqld start Starting MySQL... SUCCESS!環境變量配置[root@node1 data]# vim /etc/profile.d/mysql.shexport PATH=$PATH:/usr/local/mysql/bin[root@node1 data]# source /etc/profile測試一下 [root@node1 data]# mysql Welcome to the MySQL monitor. Commands end with ; or \g. Your MySQL connection id is 1 Server version: 5.5.33-log MySQL Community Server (GPL)Copyright (c) 2000, 2013, Oracle and/or its affiliates. All rights reserved.Oracle is a registered trademark of Oracle Corporation and/or its affiliates. Other names may be trademarks of their respective owners.Type 'help;' or '\h' for help. Type '\c' to clear the current input statement.mysql> show databases; +--------------------+ | Database | +--------------------+ | information_schema | | mysql | | performance_schema | | test | +--------------------+ 4 rows in set (0.03 sec)mysql>好了,到這里master的mysql配置完成,下面我們進行slave的mysql配置.
slave:
啟動mysql[root@node2 data]# service mysqld start Starting MySQL... SUCCESS!情況變量配置[root@node2 data]# vim /etc/profile.d/mysql.shexport PATH=$PATH:/usr/local/mysql/bin[root@node1 data]# source /etc/profile測試一下[root@node2 data]# mysql Welcome to the MySQL monitor. Commands end with ; or \g. Your MySQL connection id is 1 Server version: 5.5.33-log MySQL Community Server (GPL)Copyright (c) 2000, 2013, Oracle and/or its affiliates. All rights reserved.Oracle is a registered trademark of Oracle Corporation and/or its affiliates. Other names may be trademarks of their respective owners.Type 'help;' or '\h' for help. Type '\c' to clear the current input statement.mysql> show databases; +--------------------+ | Database | +--------------------+ | information_schema | | mysql | | performance_schema | | test | +--------------------+ 4 rows in set (0.06 sec)mysql>(1).解壓并鏈接
(2).新建mysql用戶
[root@node2 ~]# tar xf mysql-5.5.33-linux2.6-x86_64.tar.gz -C /usr/local/ [root@node2 ~]# cd /usr/local/ [root@node2 local]# ln -sv /usr/local/mysql-5.5.33-linux2.6-x86_64 mysql "mysql"-> "/usr/local/mysql-5.5.33-linux2.6-x86_64" [root@node2 local]# cd mysql [root@node2 mysql]# ll 總用量 200 drwxr-xr-x 2 root root 4096 8月 24 18:41 bin -rw-r--r-- 1 7161 wheel 17987 7月 15 20:01 COPYING drwxr-xr-x 3 root root 4096 8月 24 18:41 data drwxr-xr-x 2 root root 4096 8月 24 18:41 docs drwxr-xr-x 3 root root 4096 8月 24 18:41 include -rw-r--r-- 1 7161 wheel 134493 7月 15 20:01 INSTALL-BINARY drwxr-xr-x 3 root root 4096 8月 24 18:41 lib drwxr-xr-x 4 root root 4096 8月 24 18:41 man drwxr-xr-x 10 root root 4096 8月 24 18:41 mysql-test -rw-r--r-- 1 7161 wheel 2496 7月 15 20:01 README drwxr-xr-x 2 root root 4096 8月 24 18:41 scripts drwxr-xr-x 27 root root 4096 8月 24 18:41 share drwxr-xr-x 4 root root 4096 8月 24 18:41 sql-bench drwxr-xr-x 3 root root 4096 8月 24 18:41 support-files先安裝libaio庫文件[root@node2 mysql]# yum install -y libaio[root@node2 mysql]# mkdir -pv /mydata/data mkdir: 已創立目錄 "/mydata" mkdir: 已創立目錄 "/mydata/data" [root@node2 mysql]# cd /mydata/data [root@node2 data]# chown -R mysql.mysql /mydata/data/[root@node2 data]# /usr/local/mysql/scripts/mysql_install_db --datadir=/mydata/data/ --basedir=/usr/local/mysql --user=mysql[root@node2 data]# ll 總用量 1084 drwx------ 2 mysql root 4096 8月 24 18:49 mysql -rw-rw---- 1 mysql mysql 27698 8月 24 18:49 mysql-bin.000001 -rw-rw---- 1 mysql mysql 1061358 8月 24 18:49 mysql-bin.000002 -rw-rw---- 1 mysql mysql 38 8月 24 18:49 mysql-bin.index drwx------ 2 mysql mysql 4096 8月 24 18:49 performance_schema drwx------ 2 mysql root 4096 8月 24 18:49 test[root@node2 mysql]# groupadd -g 3306 mysql [root@node2 mysql]# useradd -u 3306 -g mysql -s /sbin/nologin -M mysql [root@node2 mysql]# id mysql uid=3306(mysql) gid=3306(mysql) 組=3306(mysql)(3).修改mysql安裝目錄所有者與所屬組
[root@node2 mysql]# chown -R root.mysql /usr/local/mysql/* [root@node2 mysql]# ll 總用量 200 drwxr-xr-x 2 root mysql 4096 8月 24 18:41 bin -rw-r--r-- 1 root mysql 17987 7月 15 20:01 COPYING drwxr-xr-x 3 root mysql 4096 8月 24 18:41 data drwxr-xr-x 2 root mysql 4096 8月 24 18:41 docs drwxr-xr-x 3 root mysql 4096 8月 24 18:41 include -rw-r--r-- 1 root mysql 134493 7月 15 20:01 INSTALL-BINARY drwxr-xr-x 3 root mysql 4096 8月 24 18:41 lib drwxr-xr-x 4 root mysql 4096 8月 24 18:41 man drwxr-xr-x 10 root mysql 4096 8月 24 18:41 mysql-test -rw-r--r-- 1 root mysql 2496 7月 15 20:01 README drwxr-xr-x 2 root mysql 4096 8月 24 18:41 scripts drwxr-xr-x 27 root mysql 4096 8月 24 18:41 share drwxr-xr-x 4 root mysql 4096 8月 24 18:41 sql-bench drwxr-xr-x 3 root mysql 4096 8月 24 18:41 support-files[root@node2 mysql]# cp support-files/mysql.server /etc/init.d/mysqld [root@node2 mysql]# chmod +x /etc/init.d/mysqld(4).為mysql提供配置文件并改動
(5).為mysql提供啟動劇本
[root@node2 mysql]# cp support-files/my-large.cnf /etc/my.cnf [root@node2 mysql]# vim /etc/my.cnf[mysqld]datadir = /mydata/data(6).初始化mysql數據庫
(7).啟動并測試
好了,slave的mysql也設置裝備擺設完成了,下面我們來設置裝備擺設主從復制.
7.設置裝備擺設master
(1).改動配置文件
(2).授權復制用戶
(3).重啟一下mysql服務
8.設置裝備擺設slave
(1).改動配置文件
(2).重啟mysql服務
(3).銜接主服務器并復制
9.主從復制測試
master:
slave:
好了,到這里異步的主從復制到這里設置裝備擺設完成.下面我們來說一下什么是半同步復制(或說是同步也行).
七、Mysql 主從復制(半同步)
1.半同步復制
在說明半同步復制之前我們先來了解一下,什么是同步復制?同步復制:同步復制可以定義為數據在同一時刻被提交到一臺或多臺機器,通常這是通過眾所周知的“兩階段提交”做到的.雖然這確實給你在多系統中堅持一致性,但也由于增加了額外的消息交換而造成性能下降.使用MyISAM或者InnoDB存儲引擎的MySQL本身并不支持同步復制,然而有些技術,例如分布式復制塊設備(簡稱DRBD),可以在下層的文件系統提供同步復制,允許第二個MySQL服務器在主服務器丟失的情況下接管(使用第二服務器的復本).了解了同步復制我們正下面來說一下,什么是半同步復制?
MYSQL 5.5開始,支持半自動復制.之前版本的MySQL Replication都是異步(asynchronous)的,主庫在執行完一些事務后,是不會管備庫的進度的.如果備庫不幸落后,而更不幸的是主庫此時又出現Crash(例如宕機),這時備庫中的數據就是不完整的.簡而言之,在主庫發生故障的時候,我們無法使用備庫來繼續提供數據一致的服務了.Semisynchronous Replication(半同步復制)則必定程度上保證提交的事務已經傳給了至少一個備庫.Semi synchronous中,僅僅保證事務的已經傳遞到備庫上,但是并不確保已經在備庫上執行完成了.
此外,還有一種情況會導致主備數據不一致.在某個session中,主庫上提交一個事務后,會等待事務傳遞給至少一個備庫,如果在這個等待過程中主庫Crash,那么也可能備庫和主庫不一致,這是很致命的.如果主備網絡故障或者備庫掛了,主庫在事務提交后等待10秒(rpl_semi_sync_master_timeout的默認值)后,就會繼續.這時,主庫就會變回本來的異步狀態.
MySQL在加載并開啟Semi-sync插件后,每一個事務需期待備庫接收日志后才返回給客戶端.如果做的是小事務,兩臺主機的延遲又較小,則Semi-sync可以實現在性能很小損失的情況下的零數據丟失.
2.異步與半同步異同
默認情況下MySQL的復制是異步的,Master上所有的更新操作寫入Binlog之后并不確保所有的更新都被復制到Slave之上.異步操作雖然效率高,但是在Master/Slave出現問題的時候,存在很高數據分歧步的風險,甚至可能丟失數據.
MySQL5.5引入半同步復制功效的目的是為了保證在master出問題的時候,至少有一臺Slave的數據是完整的.在超時的情況下也可以臨時轉入異步復制,保障業務的正常使用,直到一臺salve追趕上之后,繼續切換到半同步模式.
3.具體設置裝備擺設
注,mysql5.5半同步插件是由谷歌提供,具體地位/usr/local/mysql/lib/plugin/下,一個是master用的semisync_master.so,一個是slave用的semisync_slave.so,下面我們就來具體配置一下.
master:
(1).安裝插件
(2).改動配置文件
(3).從新啟動服務
slave:
(1).安裝插件
(2).改動配置文件
(3).從新啟動服務
4.查看一下狀況
master:
slave:
5.測試一下
master:
注,大家可以看到創建一個表的插入一個數據的時間都很長,闡明半同步配置完成.
6.模擬一下故障
slave:
注,年夜家可以看到主服務器會卡1s,我們超時時間設置的為1s.
7.查看一下狀況
好了,到這里我們就配置完成了半同步復制.希望年夜家有所收獲.下面我們來簡單說一下mysql復制的工具.
八、Mysql 復制對象
1.percona-toolkit簡介
percona-toolkit是一組高級命令行工具的集合,用來執行各種通過手工執行非常復雜和麻煩的mysql和系統任務,這些任務包含:
反省master和slave數據的一致性
有效地對記載進行歸檔
查找反復的索引
對服務器信息進行匯總
闡發來自日志和tcpdump的查詢
當系統出問題的時候收集緊張的系統信息
半同步復制的基本流程
MySQL半同步復制的實現是建立在MySQL異步復制的基礎上的.MySQL支持兩種略有分歧的半同步復制:AFTER_SYNC和AFTER_COMMIT(受rpl_semi_sync_master_wait_wait_point控制).
開啟半同步復制時,Master在返回之前會期待Slave的響應或超時.當Slave超時時,半同步復制退化成異步復制.這也是MySQL半同步復制存在的一個問題.本文不討論Salve超時的情形(不討論異步復制).
半同步復制AFTER_SYNC模式的根本流程
AFTER_SYNC模式是MySQL 5.7才支撐的半同步復制方式,也是MySQL5.7默認的半同步復制方式:
Prepare the transaction in the storage engine(s).
Write the transaction to the binlog, flush the binlog to disk.
Wait for at least one slave to acknowledge the reception for the binlog events for the transaction.
Commit the transaction to the storage engine(s).
半同步復制AFTER_COMMIT模式的根本流程
MySQL 5.5和5.6的半同步復制只支撐AFTER_COMMIT:
Prepare the transaction in the storage engine(s).
Write the transaction to the binlog, flush the binlog to disk.
Commit the transaction to the storage engine(s).
Wait for at least one slave to acknowledge the reception for the binlog events for the transaction.
AFTER_SYNC和AFTER_COMMIT兩種方式的小結
AFTER_SYNC: 日記復制到Slave之后,Master再commit.
所有在master上commit的事務都曾經復制到slave.
所有已經復制到slave的事務在master不一定commit了(好比,master將日志復制到slave之后,在commit之前宕機了)
AFTER_COMMIT:Master commit之后再將日記復制到Slave.
所有master上commit的事務不一定復制到slave.(好比,master commit之后,還沒來得及將日志復制到slave就宕機了)
所有已經復制到slave的事務在master上必定commit了.
很明顯,
AFTER_COMMIT在master宕機的環境下,無法保證數據的一致性(master commit之后,還沒來得及將日志復制到slave就宕機了).本文接下來只討論AFTER_SYNC模式.MySQL5.7.3開始支持配置半同步復制期待Slave應答的個數:rpl_semi_sync_master_wait_slave_count .
AFTER_SYNC模式下的異常情況闡發
非常情況1:master宕機后,主備切換.
master執行事務T,在將事務T的binlog刷到硬盤之前,master產生宕機.slave升級為master.master重啟后,crash recovery會對事務T進行回滾.主備數據一致.
master執行事務T,在將事務T的binlog刷到硬盤之后,收到slave的ACK之前,master產生宕機(存在pendinglog).slave升級為master.
2.1 slave還沒有收到事務T的binlog,master重啟后,crash recovery會直接提交pendinglog.主備數據紛歧致.
2.2 slave已經收到事務T的binlog.主備數據同等.
非常情況2:master宕機后,不切換主機.只需考慮非常情況1中的2.1.
master重啟后,直接提交pendinglog,此時,主備數據紛歧致:
slave連接上master,通過異步復制的方式得到事務T的binlog.主備數據一致.
slave還沒來得及復制事務T的binlog,如果master又發生宕機,磁盤損壞.主備數據紛歧致,事務T的數據丟失.
異常情況處置
從上面異常情況的簡單分析我們得知,半同步復制必要處理master宕機后重啟存在pendinglog(slave沒有應答的binlog)的特殊情況.
針對master宕機后,不進行主備切換的情形:
在crash recovery之后,master比及slave的連接和復制,直到至少有一個slave復制了所有已提交的事務的binlog.(SHOW MASTER STATUS on master and SELECT master_pos_wait() on slave).
針對master宕機后,進行主備切換的情形:
舊master重啟后,在crash recovery時,對pendinglog進行回滾.(人工截斷master的binlog未復制的部門?)
思慮
為什么master重啟之后,crash recovery的過程中,是直接commit pendinglog,而不是重試哀求slave的應答呢?
MySQL的異步復制和半同步復制都是由slave觸發的,slave主動去銜接master同步binlog.
沒有產生主備切換,機器重啟后無法知道哪臺機器是slave.
如果產生主備切換,它已經不是master了,則不會再有slave連上來.如果繼續等待,則無法正常運行.
總結
MySQL半同步復制存在以下問題:
當Slave超不時,會退化成異步復制.
當Master宕機時,數據一致性無法保證,必要人工處理.
復制是串行的.
正因為MySQL在主備數據一致性存在著這些問題,影響了互聯網業務7*24的高可用服務,因此各大公司紛紛祭出本身的“補丁”:騰訊的TDSQL、微信的PhxSQL、阿里的AliSQL、網易的InnoSQL.
MySQL官方曾經在MySQL5.7推出新的復制模式——MySQL Group Replication.
歡迎參與《MySQL半同步復制》討論,分享您的想法,維易PHP學院為您提供專業教程。
轉載請注明本頁網址:
http://www.snjht.com/jiaocheng/7084.html
同類教程排行
- Mysql實例mysql報錯:Deadl
- MYSQL數據庫mysql導入sql文件
- MYSQL的UTF8MB4編碼排序要用u
- MYSQL教程mysql自定義split
- 如何打造MySQL高可用平臺
- MYSQL創建表出錯Tablespace
- Mysql必讀MySQL中CLIENT_
- MYSQL數據庫mysql常用字典表(完
- Mysql應用MySql的Communi
- Mysql入門解決MySQL Sendi
- Mysql必讀關于skip_name_r
- MYSQL數據庫MySQL實現兩張表數據
- Mysql實例使用dreamhost空間
- MYSQL數據庫mysql 查詢表中平均
- MYSQL教程mysql 跨表查詢、更新