PHP實例:基于PHP實現用戶注冊登錄功能
《PHP實例:基于PHP實現用戶注冊登錄功能》要點:
本文介紹了PHP實例:基于PHP實現用戶注冊登錄功能,希望對您有用。如果有疑問,可以聯系我們。
本文介紹的是基于PHP實現用戶注冊登錄功能,本項目分為四部分內容:1前端頁面制作,2驗證碼制作,3實現注冊登陸,4功能完善.具體情況可以往下看.
PHP學習
驗證碼制作
PHP學習
一、實驗簡介
PHP學習
本次實驗將會帶領大家使用面向對象的思想封裝一個驗證碼類.并在注冊和登陸界面展示使用.通過本次實驗的學習,你將會領悟到 PHP 的 OOP 思想,以及 GD 庫的使用,驗證碼生成.
PHP學習
1.1 涉及到的知識點
PHP學習
- PHP
- GD庫
- OOP編程
1.2 開發工具
PHP學習
sublime,一個方便快速的文本編輯器.點擊桌面左下角: 應用程序菜單/開發/sublime
PHP學習
二、封裝驗證碼類
PHP學習
2.1 建立目錄以及準備字體
PHP學習
在 web 目錄下建立一個 admin 目錄作為我們的后臺目錄,存放后臺代碼文件.在 admin 下建立一個 fonts 目錄,用于存放制作驗證碼所需字體.
PHP學習
在 admin 下新建一個 Captcha.php 文件,這就是我們需要編輯的驗證碼類文件.
PHP學習
當前目錄層次結構: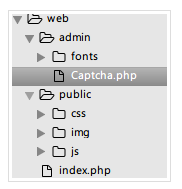 PHP學習
PHP學習
編輯 Captcha.php 文件:
PHP學習
<?php
/**
* Captcha class
*/
class Captcha
{

  function __construct()
  {
    # code...
  }
}
添加該類的私有屬性和構造方法:
PHP學習
<?php
/**
* Captcha class
*/
class Captcha
{
  private $codeNum;  //驗證碼位數
  private $width;  //驗證碼圖片寬度
  private $height;  //驗證碼圖片高度
  private $img;  //圖像資源句柄
  private $lineFlag;  //是否生成干擾線條
  private $piexFlag;  //是否生成干擾點
  private $fontSize;  //字體大小
  private $code;  //驗證碼字符
  private $string;  //生成驗證碼的字符集
  private $font;  //字體
  function __construct($codeNum = 4,$height = 50,$width = 150,$fontSize = 20,$lineFlag = true,$piexFlag = true)
  {
    $this->string = 'qwertyupmkjnhbgvfcdsxa123456789';  //去除一些相近的字符
    $this->codeNum = $codeNum;
    $this->height = $height;
    $this->width = $width;
    $this->lineFlag = $lineFlag;
    $this->piexFlag = $piexFlag;
    $this->font = dirname(__FILE__).'/fonts/consola.ttf';
    $this->fontSize = $fontSize;
  }
}
字體文件可通過以下命令下載到 fonts 目錄:PHP學習
$ wget http://labfile.oss.aliyuncs.com/courses/587/consola.ttf
PHP學習
接下來開始編寫具體的方法:PHP學習
創建圖像資源句柄
PHP學習
//創建圖像資源
public function createImage(){
    $this->img = imagecreate($this->width, $this->height);  //創建圖像資源
    imagecolorallocate($this->img,mt_rand(0,100),mt_rand(0,100),mt_rand(0,100));  //填充圖像背景(使用淺色)
  }
用到的相關函數PHP學習
- imagecreate:新建一個基于調色板的圖像
- imagecolorallocate:為一幅圖像分配顏色
- mt_rand:生成更好的隨機數
創建驗證碼字符串并輸出到圖像
PHP學習
//創建驗證碼
public function createCode(){
    $strlen = strlen($this->string)-1;
    for ($i=0; $i < $this->codeNum; $i++) {
      $this->code .= $this->string[mt_rand(0,$strlen)];  //從字符集中隨機取出四個字符拼接
    }
     $_SESSION['code'] = $this->code;  //加入 session 中

   //計算每個字符間距
    $diff = $this->width/$this->codeNum;
    for ($i=0; $i < $this->codeNum; $i++) {
          //為每個字符生成顏色(使用深色)
     $txtColor = imagecolorallocate($this->img,mt_rand(100,255),mt_rand(100,255),mt_rand(100,255));
     //寫入圖像
      imagettftext($this->img, $this->fontSize, mt_rand(-30,30), $diff*$i+mt_rand(3,8), mt_rand(20,$this->height-10), $txtColor, $this->font, $this->code[$i]);
    }
  }
用到的相關函數:PHP學習
- imagettftext:用 TrueType 字體向圖像寫入文本
創建干擾線條
PHP學習
//創建干擾線條(默認四條)
public function createLines(){
    for ($i=0; $i < 4; $i++) {
      $color = imagecolorallocate($this->img,mt_rand(0,155),mt_rand(0,155),mt_rand(0,155));  //使用淺色
      imageline($this->img,mt_rand(0,$this->width),mt_rand(0,$this->height),mt_rand(0,$this->width),mt_rand(0,$this->height),$color);
    }
  }
用到的相關函數:PHP學習
- imageline:畫一條線段
創建干擾點
PHP學習
//創建干擾點 (默認一百個點)
public function createPiex(){
    for ($i=0; $i < 100; $i++) {
      $color = imagecolorallocate($this->img,mt_rand(0,255),mt_rand(0,255),mt_rand(0,255));
      imagesetpixel($this->img,mt_rand(0,$this->width),mt_rand(0,$this->height),$color);
    }
  }
使用的相關函數:PHP學習
- imagesetpixel:畫一個單一像素
對外輸出圖像:
???PHP學習
 public function show()
  {
    $this->createImage();
    $this->createCode();
    if ($this->lineFlag) {  //是否創建干擾線條
      $this->createLines();
    }
    if ($this->piexFlag) {  //是否創建干擾點
      $this->createPiex();
    }
    header('Content-type:image/png');  //請求頁面的內容是png格式的圖像
    imagepng($this->img);  //以png格式輸出圖像
    imagedestroy($this->img);  //清除圖像資源,釋放內存
  }
用到的相關函數:PHP學習
- imagepng:以 PNG 格式將圖像輸出到瀏覽器或文件
- imagedestroy:銷毀一圖像
對外提供驗證碼:
PHP學習
public function getCode(){
    return $this->code;
  }
完整代碼如下:
<?php
/**
* Captcha class
*/
class Captcha
{
  private $codeNum;
  private $width;
  private $height;
  private $img;
  private $lineFlag;
  private $piexFlag;
  private $fontSize;
  private $code;
  private $string;
  private $font;
  function __construct($codeNum = 4,$height = 50,$width = 150,$fontSize = 20,$lineFlag = true,$piexFlag = true)
  {
    $this->string = 'qwertyupmkjnhbgvfcdsxa123456789';
    $this->codeNum = $codeNum;
    $this->height = $height;
    $this->width = $width;
    $this->lineFlag = $lineFlag;
    $this->piexFlag = $piexFlag;
    $this->font = dirname(__FILE__).'/fonts/consola.ttf';
    $this->fontSize = $fontSize;
  }
  public function createImage(){
    $this->img = imagecreate($this->width, $this->height);
    imagecolorallocate($this->img,mt_rand(0,100),mt_rand(0,100),mt_rand(0,100));
  }
  public function createCode(){
    $strlen = strlen($this->string)-1;
    for ($i=0; $i < $this->codeNum; $i++) {
      $this->code .= $this->string[mt_rand(0,$strlen)];
    }
    $_SESSION['code'] = $this->code;
    $diff = $this->width/$this->codeNum;
    for ($i=0; $i < $this->codeNum; $i++) {
      $txtColor = imagecolorallocate($this->img,mt_rand(100,255),mt_rand(100,255),mt_rand(100,255));
      imagettftext($this->img, $this->fontSize, mt_rand(-30,30), $diff*$i+mt_rand(3,8), mt_rand(20,$this->height-10), $txtColor, $this->font, $this->code[$i]);
    }
  }
  public function createLines(){
    for ($i=0; $i < 4; $i++) {
      $color = imagecolorallocate($this->img,mt_rand(0,155),mt_rand(0,155),mt_rand(0,155));
      imageline($this->img,mt_rand(0,$this->width),mt_rand(0,$this->height),mt_rand(0,$this->width),mt_rand(0,$this->height),$color);
    }
  }
  public function createPiexs(){
    for ($i=0; $i < 100; $i++) {
      $color = imagecolorallocate($this->img,mt_rand(0,255),mt_rand(0,255),mt_rand(0,255));
      imagesetpixel($this->img,mt_rand(0,$this->width),mt_rand(0,$this->height),$color);
    }
  }
  public function show()
  {
    $this->createImage();
    $this->createCode();
    if ($this->lineFlag) {
      $this->createLines();
    }
    if ($this->piexFlag) {
      $this->createPiexs();
    }
    header('Content-type:image/png');
    imagepng($this->img);
    imagedestroy($this->img);
  }
  public function getCode(){
    return $this->code;
  }
}
以上就是驗證碼類的全部代碼.看起來確實挺簡單的,不過用的圖像處理函數比較多,上面相關的函數我也做了必要的鏈接和用途說明.這些函數也不用死記硬背,遇到不清楚的,隨時查閱 PHP 官方文檔,最重要的是還有中文文檔.
PHP學習
2.2 使用驗證碼
PHP學習
既然已經封裝完畢,那就可以開始使用了.這里為了方便,直接在 Captcha 類的下方調用該類:
PHP學習
session_start(); //開啟session
$captcha = new Captcha();  //實例化驗證碼類(可自定義參數)
$captcha->show();  //調用輸出
三、前端展示
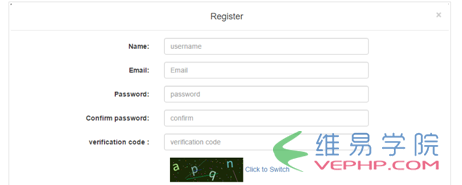
PHP學習
后端已經準備好了驗證碼,前端界面就可以展示了,修改 index.php 中的注冊與登陸表單的驗證碼部分:
PHP學習
<div class="form-group">
 <div class="col-sm-12">
   <img src="admin/Captcha.php" alt="" id="codeimg" onclick="this.src = 'admin/Captcha.php?'+Math.random();">
   <span>Click to Switch</span>
 </div>
</div>
img 標簽添加了點擊事件的 js 代碼,這樣就可以實現點擊更換驗證碼的功能!
PHP學習
效果圖:PHP學習
PHP學習
四、完善
PHP學習
到目前為止,我們的驗證碼模塊基本就完成了.學習到這里,大家應該對面向對象編程有了進一步的理解.也領悟到了一絲 OOP 思想.OOP 的三大特征:封裝,繼承,多態.我們這里只用到了一點封裝的思想.大家可以繼續完善和改進這個驗證碼類,設計出更加完美的類.這個實驗也告訴我們,PHP 的函數很多,不要死記硬背,多看官方文檔.
PHP學習
轉載請注明本頁網址:
http://www.snjht.com/jiaocheng/3048.html
同類教程排行
- PHP如何把圖片base64轉為buff
- qhQrCodeReader組件:PHP
- PHP用curl采集時,出現Recv f
- LINUX PHP7如何把curl擴展的
- PHP學習:利用PHP_XLSXWrit
- error 35: SSL connec
- NOTICE: PHP message:
- PHPStorm2017.1.1怎么去掉
- PHP集成環境phpstudy啟動時80
- php錯誤imagecreatefrom
- 怎樣把phpstorm(或Intelli
- PHP7新增的NULL合并運算符??和?
- PHP錯誤imagecreatefrom
- 防跨站提交和PHP偽造來源referer
- php保存圖片時報錯warning:im